Hey guys, this is going to be the guide where you can get how to download TP-LINK OMADA for PC and I’m going to let you know about the thing is pretty simple ways. You need to go through the guide I’m sharing down here and within a few minutes, you’ll be done with everything. Then you can start using this TP-LINK OMADA Android App at your computer.
The guide I’m sharing down here is going to work on any Windows and Mac computer and you don’t need to worry about anything since it will be a complete step by step process. You simply need to go through whatever I’ll be sharing with you and that’s all will be done from my end.
I’ll be sharing the features of TP-LINK OMADA PC first so that you can come to know exactly what it’s all about and how it’s going to benefit you in using it on your computer. You’re aware of the fact that TP-LINK OMADA App isn’t available officially for the PC platform but still, there is a way to do the same. If you find any trouble then just write it down in the comment section and I’ll bring out the solution as soon as I can.
About TP-LINK OMADA App
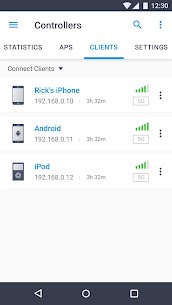
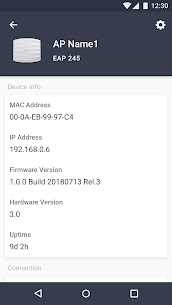
Omada app is used for configuring and managing your Omada EAPs. You can change settings, monitor the network status and manage clients, all from the convenience of a smart phone or tablet.
STANDALONE MODE
Standalone mode is designed for managing EAPs right away without having to spend time configuring a controller. Each EAP is managed separately. This mode is recommended for networks which only have a few EAPs and require only basic functions, such as home network.
CONTROLLER MODE
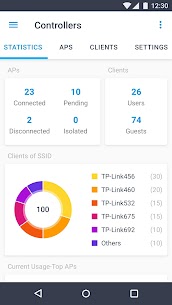
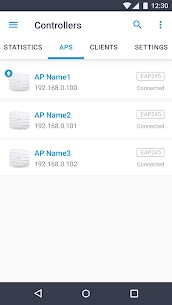
Controller mode works together with a software Omada Controller or a hardware Cloud Controller, and is suitable for managing multiple EAPs centrally. Controller mode allows you to configure and automatically synchronize unified wireless settings to all EAPs in the network. Compared to Standalone Mode, more configuration options are available in Controller mode.
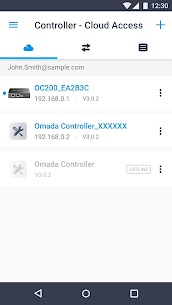
You can manage EAPs in Controller mode in two ways: via Local Access or Cloud Access. In Local Access mode, the Omada app can manage EAPs when the Controller and your mobile device are in the same subnet; in Cloud Access mode, the Omada app can access the Controller across the internet so you can manage your EAPs wherever you are.
Compatibility List:
Controller Mode currently supports software Omada Controller v3.0.2 and hardware Cloud Controller (OC200 V1).
Standalone Mode currently supports the following models (with latest firmware):
EAP245 (EU)/(US) V1
EAP225 (EU)/(US) V3/V2/V1
EAP115 (EU)/(US) V4/V2/V1
EAP110 (EU)/(US) V4/V2/V1
EAP225-Outdoor (EU)/(US) V1
EAP110-Outdoor (EU)/(US) V3/V1
EAP115-Wall (EU) V1
EAP225-Wall (EU) V2
*The latest firmware is required and can be downloaded from https://www.tp-link.com/omada_compatibility_list.
More devices supported by the app are coming soon!
Method 1: Procedure to Download TP-LINK OMADA for PC using Bluestacks Emulator
TP-LINK OMADA is an Android app and so you will require a nice Android emulator for using it on PC. Bluestacks is the most popular emulator which people use nowadays on their PC. Now, follow the below steps to download the TP-LINK OMADA PC version.
- First of all, you have to go to the website of Bluestacks and later tap on the button “Download Bluestacks 5 Latest Version”.
- Now go to the download folder and double click on the setup file to start the installation.
- Then the installation process begins in some seconds.
- You will have to give some clicks until you get the “Next” option.
- The next step is to hit the “Install” button and the procedure will start in some seconds.
- Further, tap on the “Finish” button.
- The next step is to open Bluestacks and go in the search column and write “TP-LINK OMADA”.
- Further, you have to click on the option “Install” which appears in the right-hand corner.
- The next step is to click on the icon of the app and start using the TP-LINK OMADA app.
Method 2: How to install TP-LINK OMADA Apk PC With Bluestacks Emulator
- Once the file is downloaded, then you need to begin installing the process. Start going through the on-screen instructions and within a few minutes, the software will be ready to use.
- Also Download TP-LINK OMADA Apk from the download button above.
- Once Bluestacks is ready for use, start it and then go to the Home option which is available within its UI.
- Now You can see the personalized option just beside the option you will see 3 dots (see screenshot).
- Click on the install Apk option as shown in the image.
- Click on it and locate the TP-LINK OMADA Apk file which you have downloaded on your PC.
- It will take a few seconds to get installed.
Method 3: TP-LINK OMADA Download for PC using MEmuplay Emulator
- First download MEmuplay from its official website.
- Once it is downloaded then double click on the file to start the installation process.
- Now follow the installation process by clicking “Next”
- Once the installation process is finished open MEmuplay and go in the Search column and type “TP-LINK OMADA”.
- Further click on the “Install” button which appears on the screen of the MEmuplay emulator, once the installation process has been done you can now use TP-LINK OMADA on PC.
Conclusion
This is how you can download TP-LINK OMADA app for PC. If you want to download this app with some other Android emulator, you can also choose Andy, Nox Player and many others, just like Bluestacks all android emulator works same.