Hey guys, this is going to be the guide where you can get how to download EXPENSE MANAGER for PC and I’m going to let you know about the thing is pretty simple ways. You need to go through the guide I’m sharing down here and within a few minutes, you’ll be done with everything. Then you can start using this EXPENSE MANAGER Android App at your computer.
The guide I’m sharing down here is going to work on any Windows and Mac computer and you don’t need to worry about anything since it will be a complete step by step process. You simply need to go through whatever I’ll be sharing with you and that’s all will be done from my end.
I’ll be sharing the features of EXPENSE MANAGER PC first so that you can come to know exactly what it’s all about and how it’s going to benefit you in using it on your computer. You’re aware of the fact that EXPENSE MANAGER App isn’t available officially for the PC platform but still, there is a way to do the same. If you find any trouble then just write it down in the comment section and I’ll bring out the solution as soon as I can.
About EXPENSE MANAGER App
Looking for an expense and budget tool? Stop searching. Expense Manager is simple, intuitive, stable and feature-rich app that is just designed for you. Everything you need at your fingertips to manage the expenditures, checkbook and budgets.
100% FREE – full features, no hidden charges or in-app purchases by Bishinews.
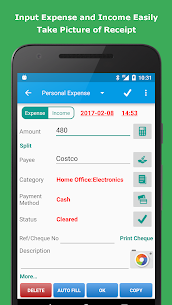
Expense Tracking
• Tracking expenses and incomes
• Split Transaction – Record all items in a single transaction with different category and amount
• Recurring expense and income
• Multiple accounts
• Taking a picture of receipt
• Tracking tax
• Tracking mileage
• Tracking debts
• Credit Card
• Credit Card and bank SMS message parsing
• Write, Print, and Email Checks
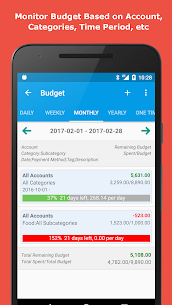
Budget and Bill Organizing
• Organizing bills by week, month and year as well as by categories
• Schedule the payments and recurring payments
• Payment alerts
• Daily, weekly, monthly, and yearly budget with progress bar
• Daily, weekly, monthly, and yearly summary
• Calendar view for expense and income
• Calendar budget forecasting
Search and Report
• Search by category, subcategory, payee/payer, payment method, status, description, tag, etc.
• Reports in HTML, CSV, Excel and PDF
• Import and export account activities
• Charts by category, subcategory, payee/payer, payment method, status, description, tag, date etc.
• Email report for print
Backup and Sync
• Automatic backup on Dropbox, Google Drive and SD Card
• Automatic sync between Android devices via Dropbox
Connect to PC via Network
• View all accounts on one page in bigger screen
• Do your regular work such as add expense/income, edit Settings, view charts etc.
• Add multiple expense or income records
• Backup data and restore data on PC
Convenient tools
• Currency converter
• Regular calculator
• Tip calculator
• Loan calculator
• Credit card payoff calculator
• Interest calculator
• Note
• Shopping list
Customization
• User can easily customize background color, action bar color and button color.
• Customizing date format
• Customizing category and subcategory
• Payment method, payee/payer, Tags, income category and status can be entered or updated by user
• Multiple currencies support
Languages
• English
• German
• French
• Spanish
• Portuguese
• Russian
• Italian
• Turkish
• Indonesian
• Chinese (Simplified)
• Chinese (Traditional)
Others
• Widgets: overview, summary, budget, calculator, quick add etc.
• PIN protection
• No registration and internet access are required.
• Active developer support
No other app can beat us on features. It’s all free.
PERMISSIONS EXPLANATION
• Storage: backup data in sdcard and external storage. Save purchase receipt in sdcard and external storage.
• GET_ACCOUNTS: back up data on Google Drive.
• SMS: Parse SMS message from your credit card and bank and save it automatically in the app. If you don’t use this feature, go to phone Settings/Apps/Expense Manager/Permissions to switch off SMS permission on phones with Android 6 and up.
• ACCESS_WiFi_STATE: This permission allows PC connection via WiFi. If you don’t need to use this app on a PC browser, you can disable this permission.
Privacy Policy
https://sites.google.com/site/expensemgr/privacy
All data save inside your phone or your personal cloud account such as Google Drive and Dropbox when you connect to. Nobody but you can access your data.
Please email question and feature request directly to developer at pfinanceapp@gmail.com. We actively support users.
Method 1: Procedure to Download EXPENSE MANAGER for PC using Bluestacks Emulator
EXPENSE MANAGER is an Android app and so you will require a nice Android emulator for using it on PC. Bluestacks is the most popular emulator which people use nowadays on their PC. Now, follow the below steps to download the EXPENSE MANAGER PC version.
- First of all, you have to go to the website of Bluestacks and later tap on the button “Download Bluestacks 5 Latest Version”.
- Now go to the download folder and double click on the setup file to start the installation.
- Then the installation process begins in some seconds.
- You will have to give some clicks until you get the “Next” option.
- The next step is to hit the “Install” button and the procedure will start in some seconds.
- Further, tap on the “Finish” button.
- The next step is to open Bluestacks and go in the search column and write “EXPENSE MANAGER”.
- Further, you have to click on the option “Install” which appears in the right-hand corner.
- The next step is to click on the icon of the app and start using the EXPENSE MANAGER app.
Method 2: How to install EXPENSE MANAGER Apk PC With Bluestacks Emulator
- Once the file is downloaded, then you need to begin installing the process. Start going through the on-screen instructions and within a few minutes, the software will be ready to use.
- Also Download EXPENSE MANAGER Apk from the download button above.
- Once Bluestacks is ready for use, start it and then go to the Home option which is available within its UI.
- Now You can see the personalized option just beside the option you will see 3 dots (see screenshot).
- Click on the install Apk option as shown in the image.
- Click on it and locate the EXPENSE MANAGER Apk file which you have downloaded on your PC.
- It will take a few seconds to get installed.
Method 3: EXPENSE MANAGER Download for PC using MEmuplay Emulator
- First download MEmuplay from its official website.
- Once it is downloaded then double click on the file to start the installation process.
- Now follow the installation process by clicking “Next”
- Once the installation process is finished open MEmuplay and go in the Search column and type “EXPENSE MANAGER”.
- Further click on the “Install” button which appears on the screen of the MEmuplay emulator, once the installation process has been done you can now use EXPENSE MANAGER on PC.
Conclusion
This is how you can download EXPENSE MANAGER app for PC. If you want to download this app with some other Android emulator, you can also choose Andy, Nox Player and many others, just like Bluestacks all android emulator works same.