Hey guys, this is going to be the guide where you can get how to download the Ampere app for PC and I’m going to let you know about the thing is pretty simple ways. You need to go through the guide I’m sharing down here and within a few minutes, you’ll be done with everything. Then you can start using this Ampere Android App at your computer.
The guide I’m sharing down here is going to work on any Windows and Mac computer and you don’t need to worry about anything since it will be a complete step by step process. You simply need to go through whatever I’ll be sharing with you and that’s all will be done from my end.
I’ll be sharing the features of this app first so that you can come to know exactly what it’s all about and how it’s going to benefit you in using it on your computer. You’re aware of the fact that Ampere App isn’t available officially for the PC platform but still, there is a way to do the same. If you find any trouble then just write it down in the comment section and I’ll bring out the solution as soon as I can.
About Ampere
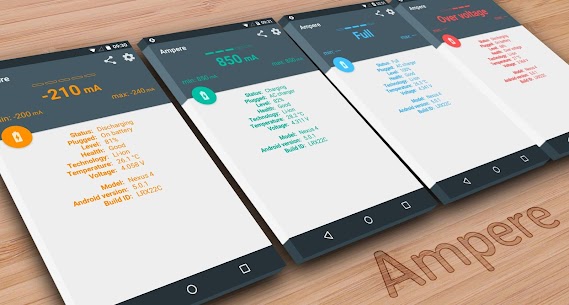
Did you ever felt, that one Charger/USB cable set charges your device really fast and the other not? Now, you can prove this with Ampere.
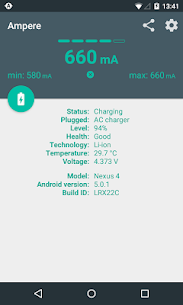
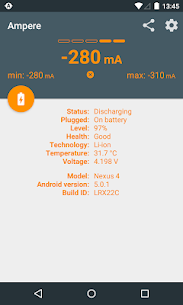
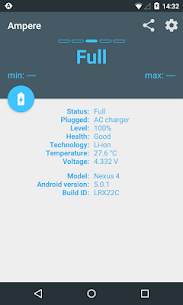
Measure the charging and discharging current of your battery.
PRO features of Ampere:
– Widgets
– Notification
– Alerts on device
– Alerts on Android Wear
Not every device is supported because there are devices which lacks an appropriate measurement chip (or the interface) and they can not be supported at all. Please read the list of not supported phones at the end of the description.
The app is not meant to be mA accurate. It is only good for evaluate which Charger/USB cable combo is working the best for you on the same device.
Start the app and wait ca. 10 seconds (“measuring” is on the display). After this time, the charging or discharging current will be shown.
The current depends on many things:
– Charger (USB/AC/Wireless)
– USB cable
– Phone type
– Current tasks running
– Display brightness
– WiFi state
– GPS state
Please don’t use the readings on this app as concrete science. However, the readings are good enough to relatively measure how various chargers and USB cables fair on the same device.
If the app shows 0mA all the time, please use the settings option “Old measurement method”. You can force the app with it to use the old measurement interface, if the Lollipop device has at least one.
Unfortunately some Samsung devices don’t give correct (measured) values (e.g.: S5), just the maximum possible charging current with the actual USB cable/charger configuration. This is a firmware problem.
—-
Background info: The app measures the charging/discharging current of the battery. If your phone is not connected to a charger, you see the discharging current which is negative. If you connect a charger then the current what the charger gives will be used to supply your phone and the remaining power will be charged into the battery.
If your phone consumes 300 mA without a charger connected (-300mA on the display), then a 500 mA charger will charge your battery maximum with 200 mA current (200mA on display).
—-
Technical info: The displayed current is an average value from 50 measurements minus the 10 upper values and the 10 lower values. The displayed current can be shaky or unstable or even zero which means, that the Android system provides unstable values. Every company uses different battery types and other hardware making it difficult to get accurate results about your charger.
—-
LiPo batteries don’t draw the maximum for the full time it takes to charge the phone. If your battery is charged almost full then the charging current will be much less as by lower battery levels.
– A graph explaining LiPo charge stages: http://batteryuniversity.com/_img/content/ion1.jpg
– Dave’s (EEVBlog) LiPo Charging Tutorial: http://youtu.be/A6mKd5_-abk
Phones/ROMS compatible only with “Old measurement method” switched on and selected the right “Measurement interface”:
➤ HTC One M7 / M8
➤ LG G3
Phones/ROMS reported to be not working with this app:
➤ Galaxy Grand Prime – fortuna3gdtv
➤ Galaxy Note2 – t03g, t03gchn, t03gchnduos, t03gcmcc, t03gctc, t03gcuduos
➤ Galaxy S3 – d2att, d2spr, d2vmu
➤ Galaxy Tab4 7.0 – degas3g
➤ HTC Desire 510 – htc_a11ul8x26
➤ HTC One S (ville), X (endeavoru), XL (evita)
➤ HTC Sensation 4G – pyramid
Please do not give wrong rating, if your phone is one of the above. Not the app is wrong, but your phone does not support this kind of measurement yet.
If the app doesn’t work on your device with pre-Lollipop Android version, then please read the first and the second posts in this XDA developer forum thread: http://goo.gl/pZqJg8 . Please post your problem with screenshots in the XDA thread.
Read: Zapya for PC Windows 10
Procedure to Download Ampere for PC using Bluestacks Emulator
Ampere is an Android app and so you will require a nice Android emulator for using it on PC. Bluestacks is the most popular emulator which people use nowadays on their PC. Now, follow the below steps to download the Ampere PC version.
- First of all, you have to go to the website of Bluestacks and later tap on the button “Download Bluestacks 4 Latest Version”.
- Now go to the download folder and double click on the setup file to start the installation.
- Then the installation process begins in some seconds.
- You will have to give some clicks until you get the “Next” option.
- The next step is to hit the “Install” button and the procedure will start in some seconds.
- Further, tap on the “Finish” button.
- The next step is to open Bluestacks and go in the search column and write “Ampere”.
- Further, you have to click on the option “Install” which appears in the right-hand corner.
- The next step is to click on the icon of the app and start using the Ampere app.
Download Ampere App for PC using MEmuplay Emulator
- First download MEmuplay from its official website.
- Once it is downloaded then double click on the file to start the installation process.
- Now follow the installation process by clicking “Next”
- Once the installation process finished open MEmuplay and go in the Search column and type “Ampere”.
- Further click on the “Install” button which appears on the screen of the MEmuplay emulator, once the installation process has done you can now use Ampere App on PC.
Conclusion
This is how you can download Ampere app for PC. If you want to download this app with some other Android emulator, you can also choose Andy, Nox Player and many others, just like Bluestacks all android emulator works same.